7 WH40K Terrain Projects

Sep 15, 2014 12:02 pm
With my WH40k campaign coming up early next year I want to add a little variety to my table. In order to encourage myself to get it done I set a goal of one full terrain piece a day despite having work most of the day and children to care for in the evening. Since I have these other obligations my terrain projects will be simple in nature, but my goal is to create semi realistic pieces. Since many wargamers I know have bland tables, use expensive store bought terrain or use the tables at a gaming club I thought I might take you on the journey with me and show you just how quickly and easily you can create good looking terrain with inexpensive or common materials. A couple of notes on the projects:

1. All terrain will be desert or arid themed as the campaign we are playing is taking place on such a world
2. All terrain must be easy enough to build and paint in a 3 hour window
3. Friday's project will be super simple as I have dinner plans that night and so will have little time to work

Look out tonight around 9:30 Est for Monday's Project:

Simple foam rock formations

Inspired by:
http://www.discoveramerica.com/~/media/a6badbaf903a4c788605e5dedcac0f47/206%20utah%20moab%20feature.jpg?w=1046&h=380&bg=ffffff
Last edited January 26, 2015 3:44 pm
Sep 15, 2014 3:43 pm
cool idea! can't wait to see how it all comes out :)
Sep 15, 2014 8:56 pm
Adding to the todo list: a functionality to like/favorite posts.
Sep 15, 2014 9:51 pm
hooray it's gonna be the facebook of forums!
-how about upvotes instead of likes?
Sep 15, 2014 11:07 pm
Monday Project: Rocky Outcropping

Tools Needed:
https://c2.staticflickr.com/4/3862/15065445610_08432bae02_m.jpg
Utility Knife, Hot Foam Knife (Optional), Sanding Brick (Or Sandpaper), Brushes, Hot Glue Gun, Hairdryer (Optional)

Materials Needed:
Drydex (or any wall filler)
PVA Glue (White Elmer's Glue)
High Density Insulation Foam
Foam Board
Faux Vegetation (or cut bristles from an old paint brush)
Sand Mixture (or kitty litter)
Earth Tone Craft Paints
Bamboo Skewers and/or Toothpicks

Step 1: Prepare your Base

1 - I used a utility knife to cut out a section of foam board. Foam board is fairly sturdy, lightweight, easy to cut, and inexpensive. I started by scoring a line in the paper sheeting of the foam board with the utility knife. Once happy with the shape I extended the blade and cut it all the way through, I used a random organic shape to enhance the realism of the piece.

2 - Once the base was cut out I used the utility knife to cut a beveled edge around the entire piece, I intentionally varied the angle to give the edges of the piece a random rocky appearance and texture.

3 - I cleaned up the base by folding the paper sheeting over the foam board along my bevel, I then used the utility knife to cut it free. Any remaining lifted up flaps I tore away removing most of the paper sheeting, this will be the ground in the terrain piece with the remaining paper sheeted side serving as the bottom. I finished cleaning up the edges by running the sanding brick along the beveled edge to remove little foam flyaways and scrap paper sheeting.
https://c2.staticflickr.com/6/5592/15251971242_a1344627d7_m.jpg

4 - I finished off the base by brushing the entire thing with a 60/40 mix of water and white glue, while the glue was wet I dumped a sand mixture (coarse sand, fine play sand, and kitty litter) onto the entire base. After shaking off the excess this is what we are left with. Some small spots remain exposed but will be hidden by paint in a future step. I allowed to dry while weighing down the edges to prevent/minimize warping.
https://c2.staticflickr.com/4/3842/15252462155_5b59624b4e_m.jpg

Step 2: Building the Rock Formations

1 - I used a hot foam knife to cut out a oval shape from my high density foam. I used the hot foam knife to shape the foam and cut an initial bevel along the edge.

2 - Using a utility knife I refined the edge and removed the melted look left behind by the hot foam knife. I was fairly careless while doing this to create random cuts, gouges, and cracks in the foam. I then attacked the bevel using random edges of the blade and at random angles to create a rock like texture to the edge of the foam.

3 - I fired up the hot glue gun, while it heated I removed some of the sand on the base where I wanted to glue down the base of the rock formation. Using the hot glue I attached the base of the formation the base of the model itself.

https://c2.staticflickr.com/4/3890/15252310422_d39c16e599_m.jpg

4 - I pressed two bamboo skewers into the rocky base and glued them down. I also press another skewer through the base of the model itself off to the left of the rocky base. I cut numerous small squares of foam, each one progressively smaller. Using the same technique used to get the rock texture on the base I attacked each individual square until they looked like weathered rock. I then pressed them over the skewers gluing each one with hot glue. I made three such rock spires connecting two together with another piece to create a small tunnel. Note that the following step will hide some of the unnatural gaps currently present.

My Result:
https://c2.staticflickr.com/4/3888/15252702752_e5226a7a71_m.jpg

What I was trying to achieve:
http://hawkebackpacking.com/images/pictures/north_america/utah/bryce_canyon_national_park/utah_bryce_canyon_national_park_06.jpg
Last edited September 16, 2014 1:36 am
Sep 16, 2014 1:13 am
Sadly I fell short of my goal tonight. I got home a little later than expected and had to setup my flickr account for the pictures. I also undertook a slightly larger project than originally intended for this week long project. The spirit of the project was to make small terrain pieces everyday, like maybe one rock spire with no base; however, I am glad I opted to do a bigger project. My hot foam cutter died half way through the project so I ended up having to use different techniques than I originally intended so the smooth archway shown in the first image of this thread became impossible. I was able to come up with a new concept and use alternative techniques to make a project that looks almost the same and serves the same purpose rules wise. When I get a new hot foam cutter I will do a tutorial and review on the new one using my original project concept presented here. Tomorrow I will be undertaking a smaller and easier project and will continue to update the Monday project as well. Each day will be a separate post in this thread so check the above post for continued progress on the Monday project.

Tomorrow we will be making a shattered Imperial Aquila. It will be a large stone sculpture that fell off of a building and smashed apart into the desert sands.
Sep 16, 2014 3:07 am
Upvote/like, same thing :p
Sep 16, 2014 11:33 am
Wow cool! If someone was thinking about just starting to do this, do you have any suggestions for easy projects that require the fewest new tools / materials and don't require sculpting experience to make look good?
Sep 16, 2014 12:46 pm
This project actually is pretty easy overall but I realize some of the materials can be somewhat exotic and I do have some tools that are less common. As far as sculpting experience goes believe it or not the results achieved in this project are the result of simply taking a hard edge (metal ruler, paint scraper, dull side of a knife) and scraping it at random angles along the edge of the foam. That being said I do have some super simple projects planned for this series, including today's project which mostly requires cutting out a template and tracing it onto a medium (cork board). I am glad to see some interest in this series (especially because you said this wasn't your kind of game). I think I might post a series of beginner level terrain projects as a separate thread titled So you Wanna Make Terrain? In the thread I will post a new project every Tuesday that is super simple, can be made in 1 hour or less, and requires no (few) special materials and no special tools. Thanks for checking out the post.
Last edited September 16, 2014 12:47 pm
Sep 16, 2014 2:15 pm
Awesome! While miniatures war games aren't my game, I do like to jazz up my RPG sessions with terrain (especially for those set piece encounters with the big villain that the whole campaign has built up to -- or even just the last few sessions have built up to. A bit of terrain and jazz helps convey that "this thing we're about to do, it's a big deal!")
Sep 16, 2014 2:50 pm
Very true indeed, I often forget the value of terrain in RPG settings as I am mostly a theatre of the mind GM. Regardless of your purpose I hope my tutorials help you out. If you have any questions always feel free to ask and if you have any specific projects in mind you would like me to try I can do that too.
Sep 16, 2014 10:30 pm
Tuesday Project: Shattered Imperial Aquila

Tools Needed:
https://c2.staticflickr.com/4/3892/15075723108_e889f82b87_m.jpg
Utility Knife, Hot Glue Gun, Sanding Brick (or Paper), Scissors, Brushes, Twist up Glue stick

Materials Needed:
Drydex (or other wall filler)
PVA Glue (Elmers)
Sand Mixture (or kitty litter)
Old CD
Cork Board
Various Craft Paints (Earth tones and greys)
Cereal Box
Foam "Rocks"
Faux Vegetation

Step 1: Prepare the Base

1 - I took a CD and placed it on top of my cardboard. Using a hobby knife I cut a disc from the cardboard to fit the CD

2 - Using a glue brush I applied a thing coat of PVA and attached the cardboard disc. This was done to give a more adhesive/paint friendly surface to the CD and to cover the hole in the center.

3 - I broke up several pieces of cork board by hand and hot glued them semi randomly to the CD, focusing near center. This is to give an uneven texture to the ground when the drydex is applied.
https://c2.staticflickr.com/4/3836/15239274976_7c90d646c8_m.jpg

4 - I smothered the entire piece in Drydex, being liberal and without watering it down, to speed up the drying process I used the hairdryer.

5 - After the Drydex hardened I hit it with the sanding brick to smooth out the surface and remove excess or unnatural looking formations.
https://c2.staticflickr.com/4/3907/15075863067_3cb1f7e556_m.jpg

Step 2: Building the Sculpture

1 - I started by finding a suitable image of the Imperial Aquila on google. I resized the image and printed it.

2 - By far the hardest part of this project I next cut the image out to make a template. I carefully made sure to preserve most of the details, but since this is a ruin I was not too concerned about perfection.

3 - Next I glued the template to the cork board using a twist up glue stick. I then cut the image into the cork board using my hobby knife. I finished this by tearing the template away and carving the remaining details into the cork board model. Cork board is made up of many small and random segments, this property makes it a pain to work with but also makes it useful for something like this. Just cutting out the shape causes numerous natural breaks and it will naturally break when pressure is applied to it. The end result doesn't look good at all for an intact sculpture (I would use a different medium for that) but as a ruin this is a perfect starting point.
https://c2.staticflickr.com/4/3921/15076251080_659580e562_m.jpg

4 - To get the broken effect I lay the piece on the uneven ground and press on two opposing sides of any of the lumps created in the previous step. This will cause the cork board to split naturally and leave a stone like broken edge. I did this in numerous places, added in several of the pieces that broke when I initially cut it out and glued them all down with hot glue. Any piece that significantly overhung the base I simply snapped off, it could have easily been buried or decayed with time.

https://c2.staticflickr.com/4/3926/15259975621_d97b07e720_m.jpg

Reflection: After completing this step I feel I may have over done the breakage. I was pretty happy with it at one point but felt some of the pieces rested unrealistically. Unfortunately in my attempt to fix that problem I broke it in further pieces and since the cork board cutout was already rough it is really hard to see what the original image was. I will press on however, but this project has proved more difficult than I intended it to be. Was simple on the drawing board, just not in execution.

Further Reflection: Upon reaching the next step I found that the previous drydex layer kept pulling up. The hot glue just wouldn't stick and the model ended up ruined. Most of the projects on this week of terrain are things I have done before and thus know work, tonight's project was an experiment, inspired by another terrain maker that make a shattered Aquila. I thought I can improve on his tutorial by using different materials but I see my idea was doomed from the start. I ultimately would like this piece of terrain on my table and so will revisit this in the future but for now I will be salvaging the CD base I made for this and will be creating something else instead. Stay tuned for future updates. Tomorrow's project is a tried and true foam crater, so that one should work, it should also be noted while steps in that project dry I will continue work on Monday's project.
Last edited September 17, 2014 12:47 am
Sep 17, 2014 1:05 am
Tuesday Project Redux: Patch of Desert Scrub
Sep 17, 2014 2:07 am
so far so good! man i wish i had the motivation to dot his more often ^-^
Sep 17, 2014 10:52 am
Thanks, though my limited time is really making this difficult. On the plus side this project is forcing me to start numerous terrain pieces and that is usually my problem. I usually will always finish something that is started, but won't always break out the tools to actually start something. Today will be a rocky crater made from blue foam. For those following this is my tentative plan:

Monday: Rocky Outcropping
Tuesday: Desert Scrub Patch
Wednesday: Rocky Crater
Thursday: Rocky Hill
Friday: Some kind of Statue or Monument
Saturday: Revisit the Shattered Aquila
Sunday: Rubble Piles
Sep 17, 2014 10:09 pm
Wednesday Project: Rocky Crater
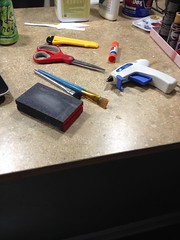
Tools Needed:
https://c2.staticflickr.com/6/5587/15269308581_d45702f2d8_m.jpg
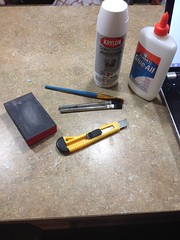
Utility Knife, Brushes, Spray Primer, Sanding Brick (or paper)

Materials Needed:
High Density Foam
Drydex
Fine Play Sand
Earth Tone Craft Paints
Cereal Card
PVA Glue

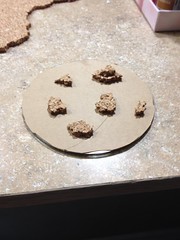
Step 1: Creating the Crater Base

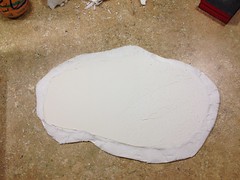
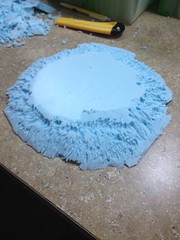
1 - I start the project by deciding on a size for the crater and cutting out a piece of blue foam. Since I am yet to replace my hot foam knife I used a utility knife to score the foam and then snapped it off by hand.

2 - I created the basic shape of the crater by cutting away the squared corners at an angle. I purposely angled the knife to create a beveled edge.

3 - I further refined the shape by cutting along the edges of the foam varying the angle of my blade and working in a semi circular manner around the piece.

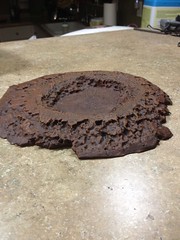
4 - When happy with the overall shaping I left with a plateau, I roughed up the edges using the same technique as used on the rock formations in Monday's project. I scraped against the edges of the foam with a straight hard edge such as the back of a knife, this created the random rocky texture to make a convincing desert rock formation.

5 - After the rocky texture was added I hit it with the sanding brick to remove fly aways and unnatural formations.
https://c2.staticflickr.com/4/3835/15271907875_8f9c0ff5ac_m.jpg

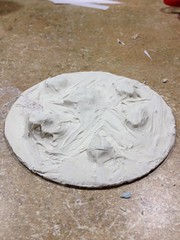
Step 2: Forming the Crater

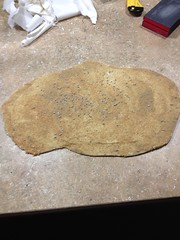
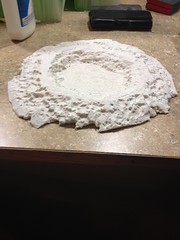
1 - Spray paint eats away at foam so to create the actual crater I simply sprayed black spray primer into the center of the foam plateau, I continued spraying until I reached the desired depth.

2 - Since I wanted models in to crater to be obscured enough to be in cover I decided to spray enough primer to basically eat completely through the piece. I tapped the model several times over the trash can and used the utility knife to drop/cut away the remaining molted foam. I decided to can provide a new bottom to the crater by gluing the piece to cereal card and cutting it to size. As long as the foam and the cereal card were the same size warping wouldn't be an issue.

3 - I finished preparing the crater by gluing it to the cereal card base and covering it with a mix of drydex, sand, and a tiny bit of water. Since foam doesn't take paint well and primer melts it, drydex is the best way to get a paintable surface and it simultaneously adds to the rocky texture. It also adds a rocky and sandy texture to the flat cardboard bottom of the crater.

https://c2.staticflickr.com/6/5594/15085839267_9b8c58f18d_m.jpg

Step 3: Painting the crater

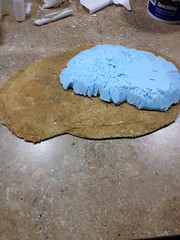
1 - I start by basing the entire model with burnt umber. I water the paint down to a milk like consistency and make sure to cover every bit of exposed drydex

2 - To shade the model I create a black wash 8 parts flow aid, 8 parts matte medium, and 1 part black paint. I apply this liberally ensuring the black flows into all of the cracks and crevices.

3 - I begin adding in color variation and highlighting by drybrushing with Burnt Sienna. I then layer up by dry brushing again with Burnt Orange and finally with Yellow Ochre. Each layer I use a lighter hand and focus on higher areas of the model. I also never clean the brush between layers thus ensuring that the colors blend nicely and highlight naturally.
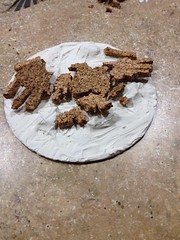
Final Results:
https://c2.staticflickr.com/4/3838/15086208538_b0428848b8_m.jpghttps://c2.staticflickr.com/6/5577/15272384312_d5e15c8df2_m.jpg

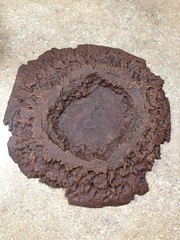
This is a simple project, taking only little more than an hour. Most of the time comes from waiting for glue or paint to dry, especially the black wash and the drydex. All drying times can be improved with a hair dryer.

Suggested Rules: Use as a crater as per the WH40k Core Rules

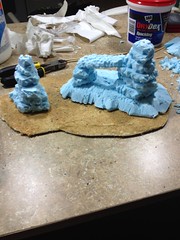
Taking this project further or other uses for these techniques: This project can easily become a water filled crater, a rubble filled crater, or even have some burning fire. See So you Wanna build terrains first post for burning flame and smoke. Creating a larger foam base and building up multiple layers, combined with certain water effects and the burning smoke effect and you can easily create an active volcano for your table or RPG set.
Last edited September 17, 2014 11:56 pm
Sep 19, 2014 12:41 am
Sadly no project tonight, I forgot it was open house at my son's school tonight.
Sep 19, 2014 3:14 am
fair. that stuff is important and such
Sep 20, 2014 2:24 pm
An oven failure at work puts this on hold, still hoping to do the Friday project today or tomorrow. Will pick this up again next week. I will continue work on each project on its respective day. This coming Monday I will add to and hopefully complete the rocky outcropping.
Oct 21, 2014 6:08 pm
More like several weeks of terrain. I have not had the time to get back to this project until now. I am hoping to pick up one of the projects tomorrow night after work. Rather than 7 days of terrain this will be just 7 terrain projects. Also still planning on starting up my beginner terrain series so look out for that. Also look out for my unboxing of and tutorials of, and initial review of Dropzone Commander.
load next

You do not have permission to post in this thread.